Tutorials:Auto Assembler:Setup test table
Setup auto assembler test table
Let's setup an auto assembler test table.
Open the Cheat Engine Tutorial and attach to the process, you can pick the 32 bit or the 64 bit depending on what you are testing.
So now on the Cheat Engine main form press Crtl+Alt+A to open an auto assemble form.
Let's add so code to allocate some global memory for test assembling and value storing.
//// --------------------  Main Section  ---------------------
globalAlloc(TestVals, 0x40) //// Globally allocates memory, same as 'alloc' with 'registerSymbol'
globalAlloc(memTest, 0x200)
[ENABLE]
//// --------------------  Enable Section  ---------------------
memTest: //// Start assembling as this address (memTest)
   // START: Test code

   // END: Test code
   ret //// return, needed for ending the threads
[DISABLE]
//// --------------------  Disable Section  --------------------
//// Reset memTest and TestVals
memTest:
   db 90 90 90 90 90 90 90 90 90 90 90 90 90 90 90 90
   db 90 90 90 90 90 90 90 90 90 90 90 90 90 90 90 90
   db 90 90 90 90 90 90 90 90 90 90 90 90 90 90 90 90
   db 90 90 90 90 90 90 90 90 90 90 90 90 90 90 90 90
   db 90 90 90 90 90 90 90 90 90 90 90 90 90 90 90 90
   db 90 90 90 90 90 90 90 90 90 90 90 90 90 90 90 90
   db 90 90 90 90 90 90 90 90 90 90 90 90 90 90 90 90
   db 90 90 90 90 90 90 90 90 90 90 90 90 90 90 90 90
   db 90 90 90 90 90 90 90 90 90 90 90 90 90 90 90 90
   db 90 90 90 90 90 90 90 90 90 90 90 90 90 90 90 90
   // 0x100
   db 90 90 90 90 90 90 90 90 90 90 90 90 90 90 90 90
   db 90 90 90 90 90 90 90 90 90 90 90 90 90 90 90 90
   db 90 90 90 90 90 90 90 90 90 90 90 90 90 90 90 90
   db 90 90 90 90 90 90 90 90 90 90 90 90 90 90 90 90
   db 90 90 90 90 90 90 90 90 90 90 90 90 90 90 90 90
   db 90 90 90 90 90 90 90 90 90 90 90 90 90 90 90 90
   db 90 90 90 90 90 90 90 90 90 90 90 90 90 90 90 90
   db 90 90 90 90 90 90 90 90 90 90 90 90 90 90 90 90
   db 90 90 90 90 90 90 90 90 90 90 90 90 90 90 90 90
   db 90 90 90 90 90 90 90 90 90 90 90 90 90 90 90 C3 //// An extra ret just in case
   // 0x200
TestVals:
   db 00 00 00 00 00 00 00 00 00 00 00 00 00 00 00 00
   db 00 00 00 00 00 00 00 00 00 00 00 00 00 00 00 00
   db 00 00 00 00 00 00 00 00 00 00 00 00 00 00 00 00
   db 00 00 00 00 00 00 00 00 00 00 00 00 00 00 00 00
Now add that to the table, and set it's description to 'Test Script'
- If you are unsure how to do that check here: How to add script to table
Now we need a script to start a new thread in the test memory we will be using.
[ENABLE]
createThread(memTest)
[DISABLE]
Now add that to the table, set it's description to 'Create Thread', and make it a child of the first script.
Now add some addresses to the table, and make them a child of the first script.
- If you are unsure how to do that check here: How to add addresses to the address list
- You can just copy the XML code below, then paste on the cheat table address list.
- Note: Cheat Engine uses XML when cutting or pasting memory records, and will automaticlly asign new IDs when pasting memory records from other tables.
- Address
- Address: memTest
- Type: Array Of Bytes
- Lenght: 0
- Address: TestVals
- Type: Array Of Bytes
- Lenght: 0
- Address
- Address: TestVals+0
- Type: 4 Bytes
- Address
- Address: TestVals+4
- Type: 4 Bytes
- Address
- Address: TestVals+8
- Type: 4 Bytes
- Address
- Address: TestVals+C
- Type: 4 Bytes
- Address
- Address: TestVals+0
- Type: 8 Bytes
- Address
- Address: TestVals+8
- Type: 8 Bytes
- Address
- Address: TestVals+0
- Type: Float
- Address
- Address: TestVals+4
- Type: Float
- Address
- Address: TestVals+8
- Type: Float
- Address
- Address: TestVals+C
- Type: Float
- Address
- Address: TestVals+0
- Type: Double
- Address
- Address: TestVals+8
- Type: Double
<?xml version="1.0" encoding="utf-8"?>
<CheatTable>
  <CheatEntries>
    <CheatEntry>
      <ID>0</ID>
      <Description>"memTest"</Description>
      <LastState Value="" RealAddress="00000000"/>
      <ShowAsHex>1</ShowAsHex>
      <VariableType>Array of byte</VariableType>
      <ByteLength>0</ByteLength>
      <Address>memTest</Address>
    </CheatEntry>
    <CheatEntry>
      <ID>1</ID>
      <Description>"TestVals"</Description>
      <LastState Value="" RealAddress="00000000"/>
      <VariableType>Array of byte</VariableType>
      <ByteLength>0</ByteLength>
      <Address>TestVals</Address>
    </CheatEntry>
    <CheatEntry>
      <ID>2</ID>
      <Description>"TestVals+0"</Description>
      <VariableType>4 Bytes</VariableType>
      <Address>TestVals+0</Address>
    </CheatEntry>
    <CheatEntry>
      <ID>3</ID>
      <Description>"TestVals+4"</Description>
      <VariableType>4 Bytes</VariableType>
      <Address>TestVals+4</Address>
    </CheatEntry>
    <CheatEntry>
      <ID>4</ID>
      <Description>"TestVals+8"</Description>
      <VariableType>4 Bytes</VariableType>
      <Address>TestVals+8</Address>
    </CheatEntry>
    <CheatEntry>
      <ID>5</ID>
      <Description>"TestVals+C"</Description>
      <VariableType>4 Bytes</VariableType>
      <Address>TestVals+C</Address>
    </CheatEntry>
    <CheatEntry>
      <ID>6</ID>
      <Description>"TestVals+0"</Description>
      <VariableType>8 Bytes</VariableType>
      <Address>TestVals+0</Address>
    </CheatEntry>
    <CheatEntry>
      <ID>7</ID>
      <Description>"TestVals+8"</Description>
      <VariableType>8 Bytes</VariableType>
      <Address>TestVals+8</Address>
    </CheatEntry>
    <CheatEntry>
      <ID>8</ID>
      <Description>"TestVals+0"</Description>
      <VariableType>Float</VariableType>
      <Address>TestVals+0</Address>
    </CheatEntry>
    <CheatEntry>
      <ID>9</ID>
      <Description>"TestVals+4"</Description>
      <VariableType>Float</VariableType>
      <Address>TestVals+4</Address>
    </CheatEntry>
    <CheatEntry>
      <ID>10</ID>
      <Description>"TestVals+8"</Description>
      <VariableType>Float</VariableType>
      <Address>TestVals+8</Address>
    </CheatEntry>
    <CheatEntry>
      <ID>11</ID>
      <Description>"TestVals+C"</Description>
      <VariableType>Float</VariableType>
      <Address>TestVals+C</Address>
    </CheatEntry>
    <CheatEntry>
      <ID>12</ID>
      <Description>"TestVals+0"</Description>
      <VariableType>Double</VariableType>
      <Address>TestVals+0</Address>
    </CheatEntry>
    <CheatEntry>
      <ID>13</ID>
      <Description>"TestVals+8"</Description>
      <VariableType>Double</VariableType>
      <Address>TestVals+8</Address>
    </CheatEntry>
  </CheatEntries>
</CheatTable>
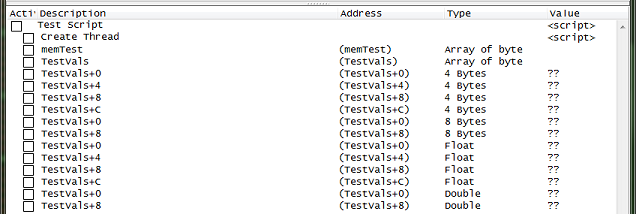
At this point you should have a cheat table that looks like this.
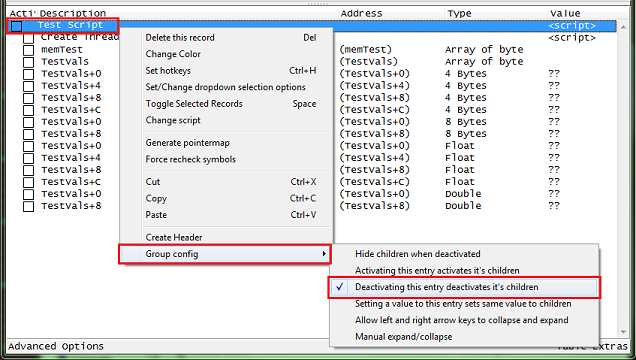
Now set the main script to disable child memory records, right click the address and selecting group config then selecting deactivating this entry deactivates it's children.
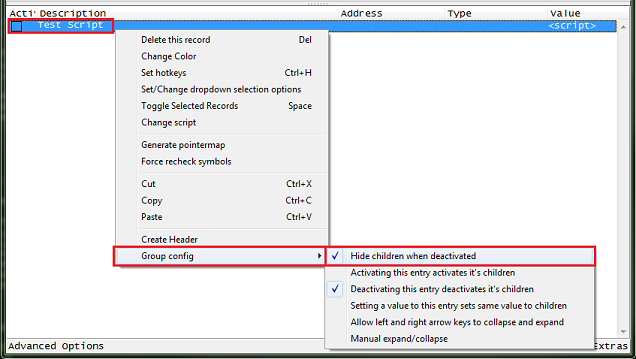
Now set the main script to hide child memory records when deactivated, right click the address and selecting group config then selecting hide children when deactivated.
So now you can write some test scripts, run a thread to test the code, with a clean registory, independend of any game to just test the code in the Cheat Engine Auto Assembler.
The TestVals is for storing values to see the registory at different points, you can also break and trace the code to see what is going on.
When testing just add your code then assemble (enable Test Script), then create the thread (enable Create Thread).
After running thread remember to check that the process is still running.
Example scripts
Testing MUL:
...
   // START: Test code
   mov eax,2
   mox ecx,3
   mul ecx
   mov [TestVals+0],edx
   mov [TestVals+4],eax
   mov [TestVals+8],ecx
   // END: Test code
...
Testing IMUL:
Testing one operand:
...
   // START: Test code
   mov eax,2
   mox ecx,3
   imul ecx
   mov [TestVals+0],edx
   mov [TestVals+4],eax
   mov [TestVals+8],ecx
   // END: Test code
...
Testing two operands:
...
   // START: Test code
   mov eax,3
   imul eax,2
   mov [TestVals+0],eax
   // END: Test code
...
Testing three operands:
...
   // START: Test code
   mov eax,0
   mov ecx,3
   imul eax,ecx,2
   mov [TestVals+0],eax
   mov [TestVals+4],ecx
   // END: Test code
...
Going further


