Cheat Engine Tutorial Guide (x64)
So let's go through the Cheat Engine Tutorial (x64).
So open Cheat Engine, then in the main menu select help then select Cheat Engine Tutorial.
Then attach to the Cheat Engine Tutorial process, it should be 'Tutorial-x86_64.exe'.
- If unsure how to attach to the process see: How to attach to a process
Contents
Step 1
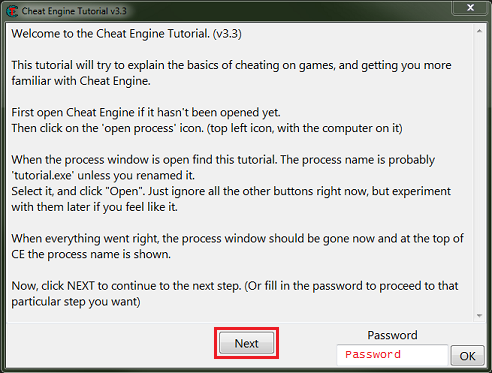
When the tutorial launches you should see some thing like this, you can just click the next button after reading the help text.
Save the password in later steps in case of crashes (from injections) and for restarting at a later time.
Step 2
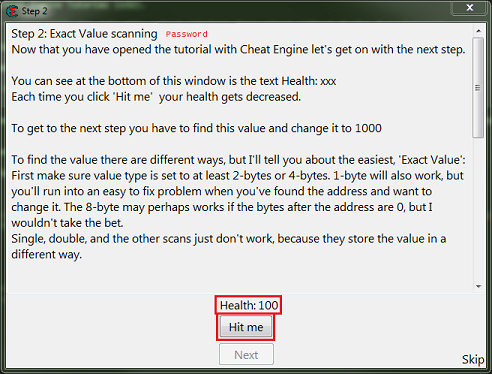
So for step 2 you will see some thing like this.
What we need to find is the health, and here it's an integer.
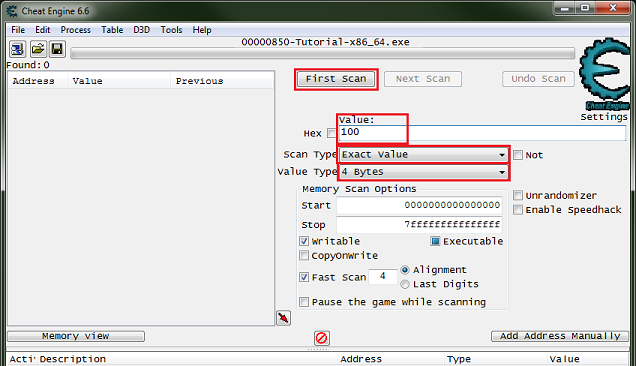
So setup the memory scanner to find an integer and for exact value scan then set the value to the current health value, most integers will be stored in a 4 byte variable, so let's start there.
Note: Integers can be stored in a 1 byte variable (byte), 2 byte variable (int16/short), 4 byte variable (int32/int), or 8 byte variable (int64/long).
When ready click the first scan button.
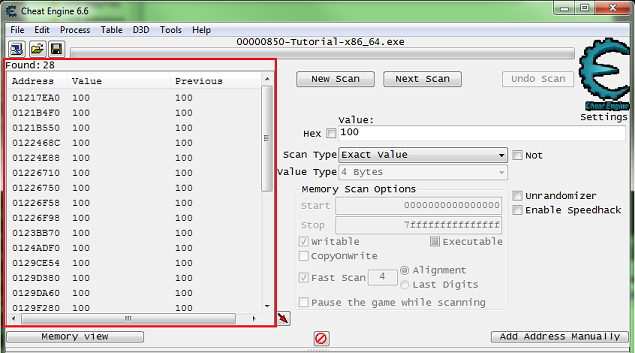
You Should see a list of addresses, in the found address list, like this.
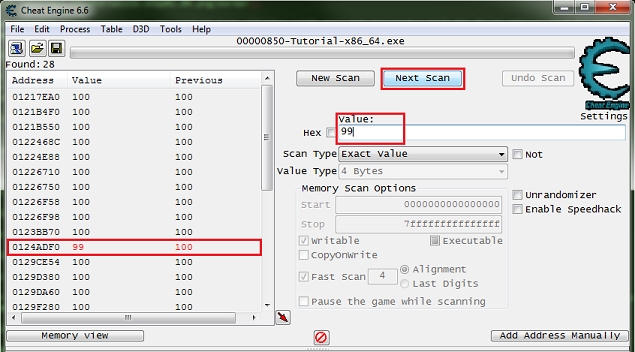
Now Click the hit me button, then reenter the current value and click the next scan button.
Note the red value in the list, this shows that the value has changed.
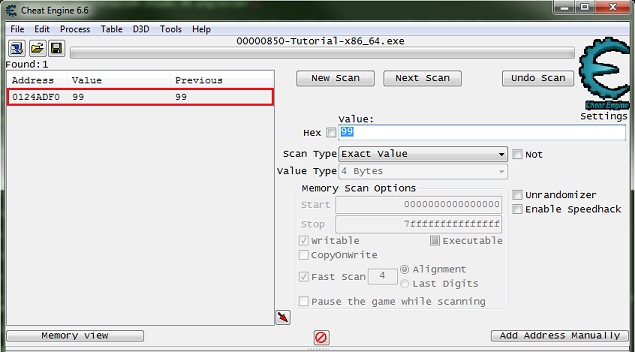
After clicking next scan you may need to keep clicking hit me and rescanning tell the found address list is small enough to work with.
Just double click the address in the found list to add it to the cheat table. Then change the value and freeze the address, double click the value in the address list to edit it, freeze it by clicking the enabler/freeze box.
Now the next button should be enabled, click it to go to the next step. Click the hit me button again if the next button is not enabled already.
Step 3
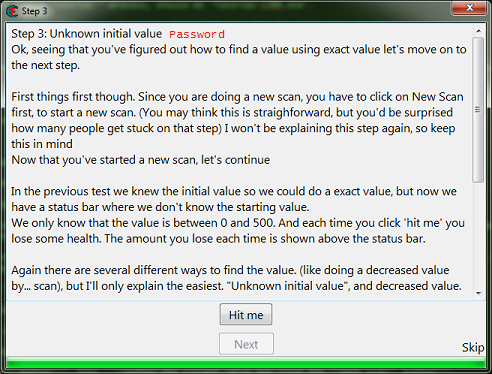
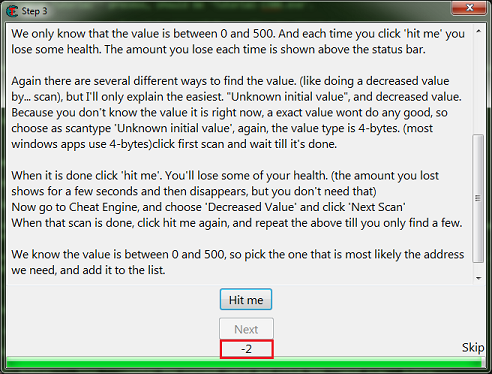
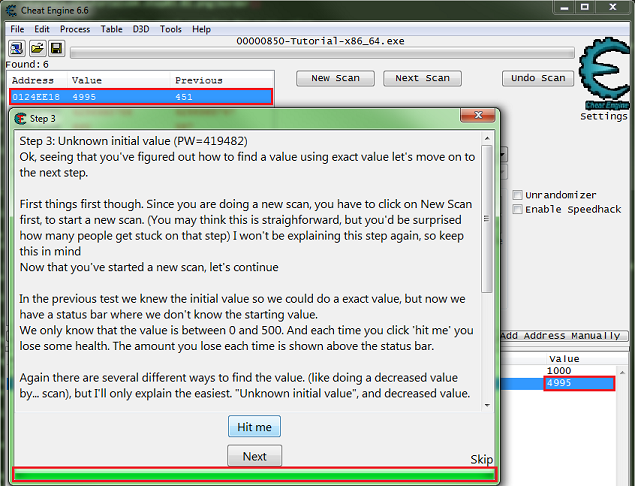
When you start step 3 you should see the form looking like this.
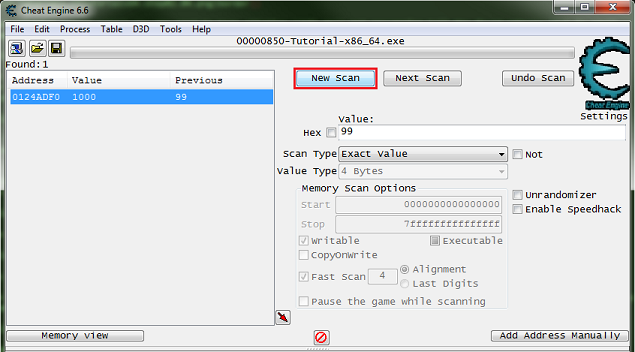
Like the help text said make sure to click the new scan button before starting new scans.
This clears the found results to start scanning for a new value.
Here is where I suggest going ahead and clicking the hit me button, just to see how the value is decreased to help in determining what value type to scan for.
Note that the value was decreased by an integer, that is a non fractional number.
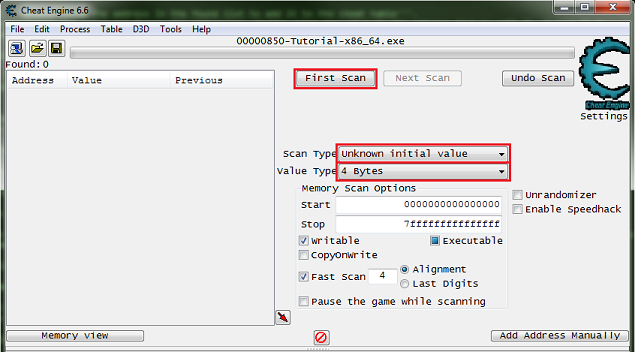
So I would setup the scanner for 4 bytes and unknown initial value. Then click the first scan button.
Now click the hit me button.
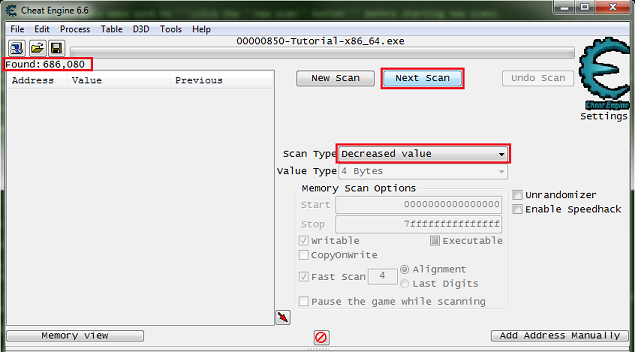
Then set the scan type to decreased value and click the nest scan button.
Note the number of found addresses, this is kinda small for most games these days, the found results can easily be in the millions for most games.
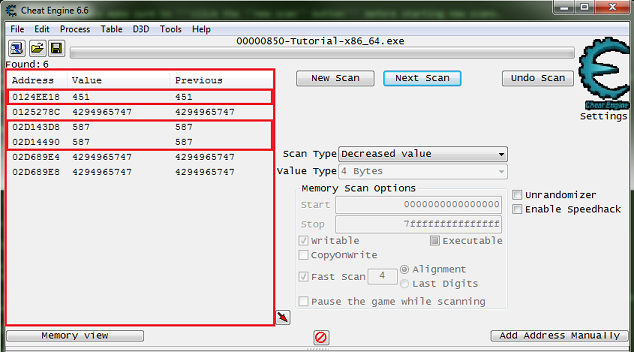
Now just keep decreasing the value with the hit me button, and scanning for a decreased value, until the found results is small enough to work with.
Now we just pick an address and change the value to see if it has the desired effect, this is just how it works.
Here is where I suggest that you always note the values (or just Ctrl+C) before changing them to set them back if they are not the right value, to keep from changing a bunch of unknown addresses and corrupting your save files when doing this in games.
The next button should become enabled as soon as you set the value to 5000. After changing the value and clicking the hit me button the progress bar should fill, but this is not needed.
Now the next button should be enabled, click it to go to the next step. Click the hit me button again if the next button is not enabled already.
Step 4
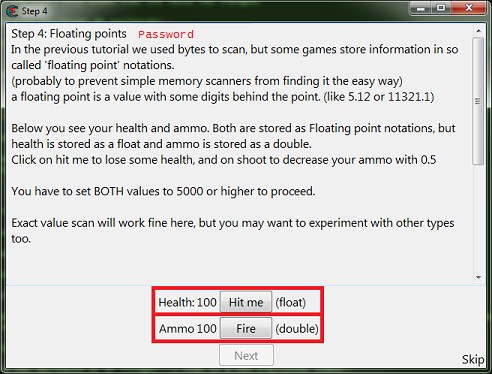
When you start step 4 you should see the form looking like this.
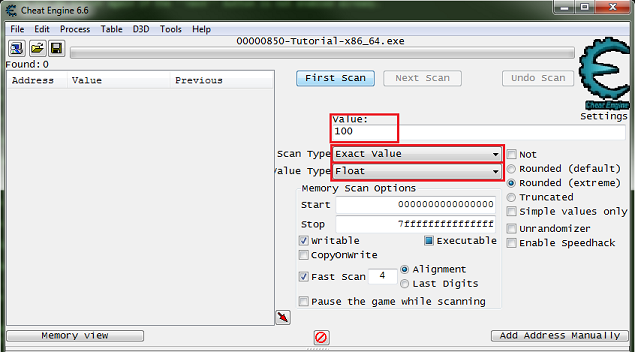
So click the new scan button. Then setup the scanner for a float, exact value, enter the current health value.
When setup click the first scan button.
So just scan like before to find the health address, then add it to the address list.
Now click the new scan button again.
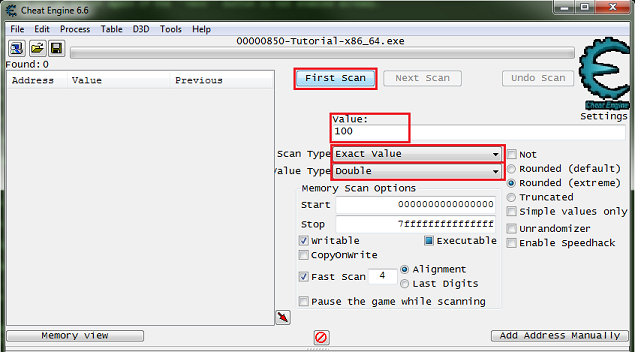
Then setup the scanner for a double, exact value, enter the current ammo value.
When setup click the first scan button.
So just scan like before to find the ammo address, then add it to the address list.
Now change the values to 5000, then the next button should become enabled. Then click the next button to progress to the next step.
Step 5
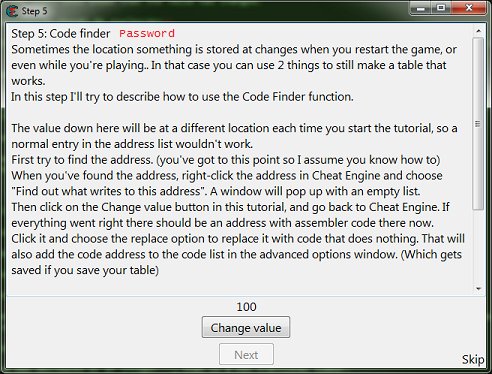
When you start step 5 you should see the form looking like this.
So first find the value then add it to the address list.
Go ahead and save the table and the password at this point, just in case the debugger isn't setup right.
- If you need help setting up the debugger see: Debugger options
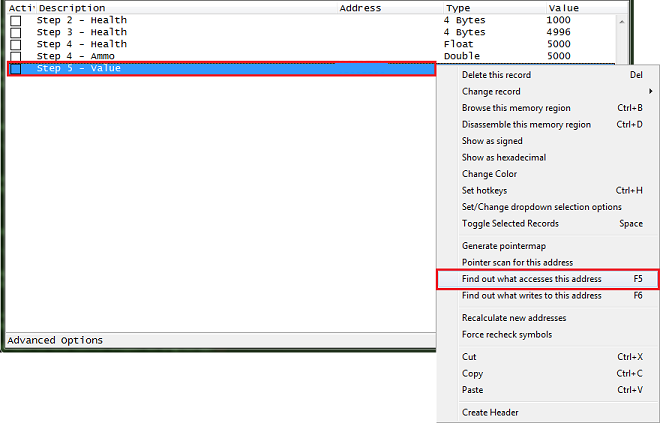
After you have the address in the address list right click it then select find out what accesses this address.
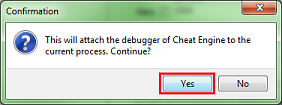
Cheat Engine will prompt you about attaching the debugger, just click the yes button.
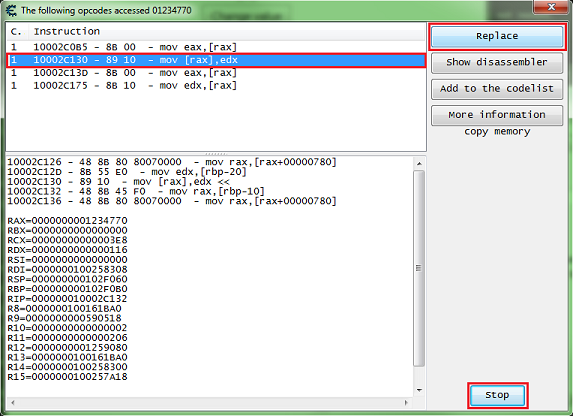
Then a debugger form will open, now click the change value button, and you should get code that shows up in the debugger form.
What we want is a write instruction. So we will be looking for some thing like one of the following:
mov [**],** add [**],** sub [**],** *** [**],**
Select the code line of the write instruction, you can click the show disassembler button to see the code in memory, then click the replace button.
Don't forget to click the stop button.
The replace button will replace that line of code with NOPs.
Cheat Engine will prompt you for a name for the entry it will add in the advanced options list.
Enter a name and click the OK button.
Now click the change value button back on the tutorial.
The next button should become enabled, then click the next button to advance to the next step.
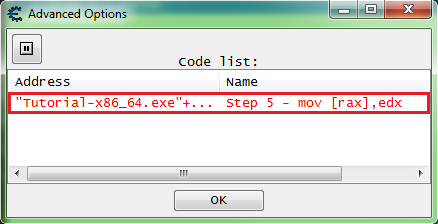
When entries in the advanced options list are replaced, they will show up with red text.
The advanced options list can be viewed by clicking the advanced options button in the status bar on the bottom left corner of the Cheat Engine main form.
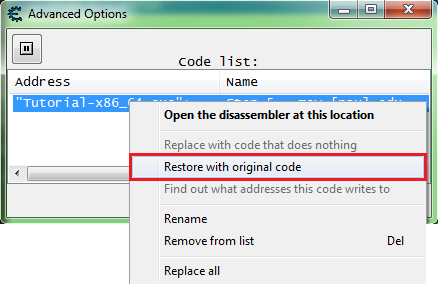
To restore the original code for an entry in the list, right click the entry and select restore with original code.
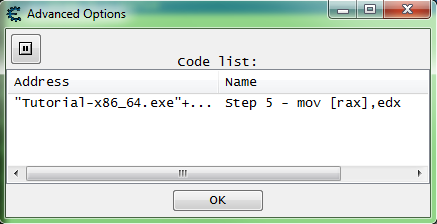
Note that the text is black after restoring.
Step 6
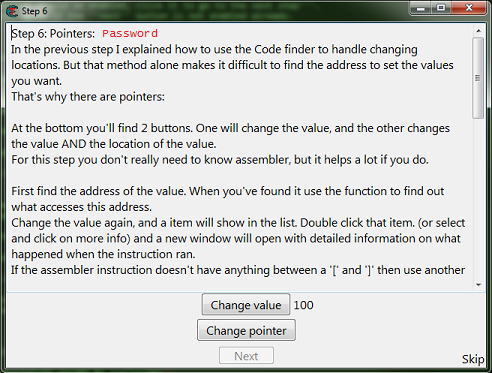
When you start step 6 you should see the form looking like this.
So first find the value then add it to the address list.
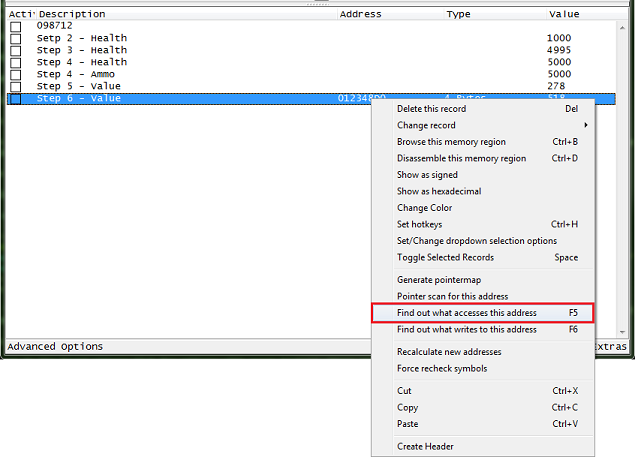
After you have the address in the address list right click it then select find out what accesses this address.
Then click the change value button, to have the process access the address.
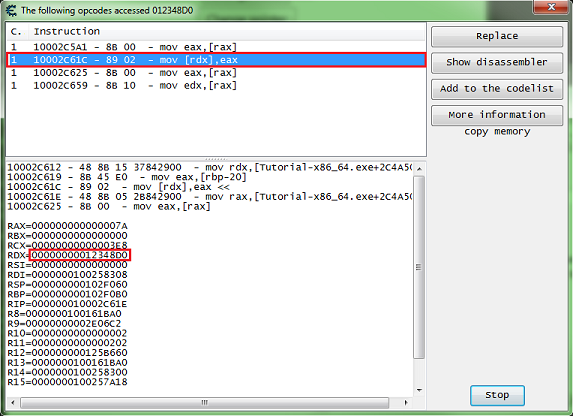
When choosing the code to find the base address for the pointer, try to select an instruction that doesn't write to the same register as the base address.
Here we're interested in the value between the square brackets ('[' and ']'), so here we want the value of EDX.
The offset here is 0, if the instruction had some thing like this:
mov [rdx+12C],eax
Then the offset would be '12C' (0x12C), note that this is in hex.
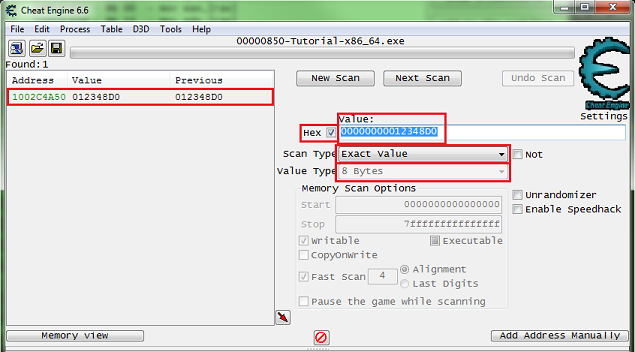
Now set the scanner for 8 bytes, exact value, check the hex check box, then take the value found and put that as the value to scan for.
When ready click the first scan button.
Look in the found address list for address with green text, these are static addresses.
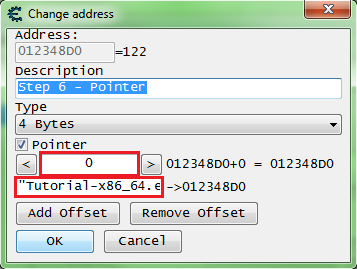
Add one to the cheat table, double click the address of the memory record that was added to the address list, copy the address then check the pointer check box, and paste the address in the pointers base address.
- If you are unsure how to do this look here: How to add addresses to the address list
So my pointer will look like this.
["Tutorial-x86_64.exe"+XXXXXX]+0
It should be setup some thing like this, remember to set the offset to the offset you found.
Click the OK button when the pointer is setup.
Now freeze the value at 5000 and click the change pointer button, the next button should become enabled.
If the next button doesn't become enabled then select another address from the found list, look for a green one that had it's value changed, and set it up like the last one and see if it points to the right value, if so change the value freeze and click the change pointer button.
Click the next button to advance to the next step.
Step 7
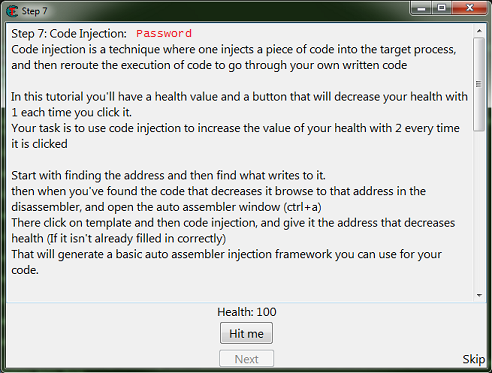
When you start step 7 you should see the form looking like this.
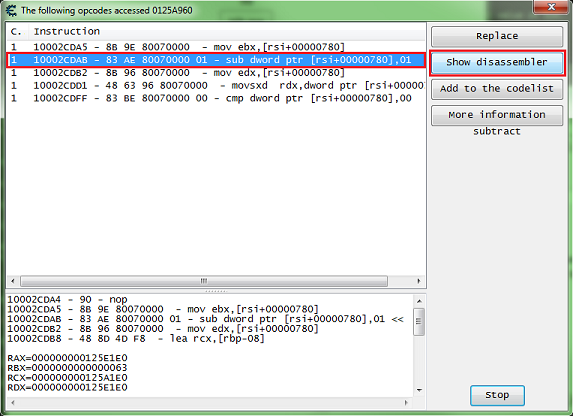
Here we'll follow the the same procedures as step 5, but instead of clicking replace click the show disassembler button.
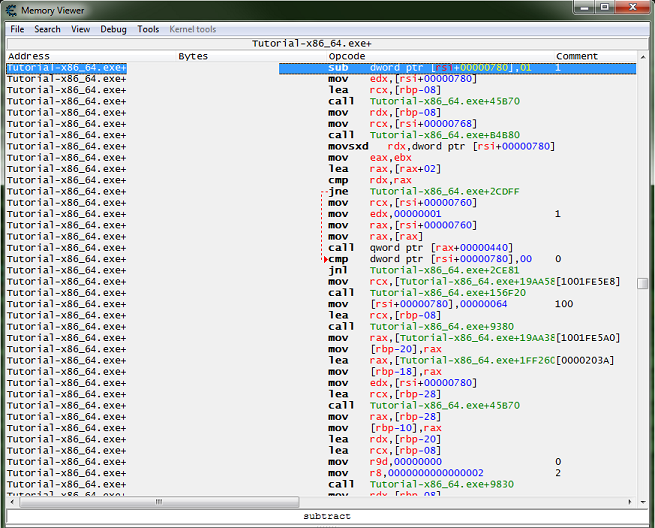
This will open the disassembler view form at the instruction's address.
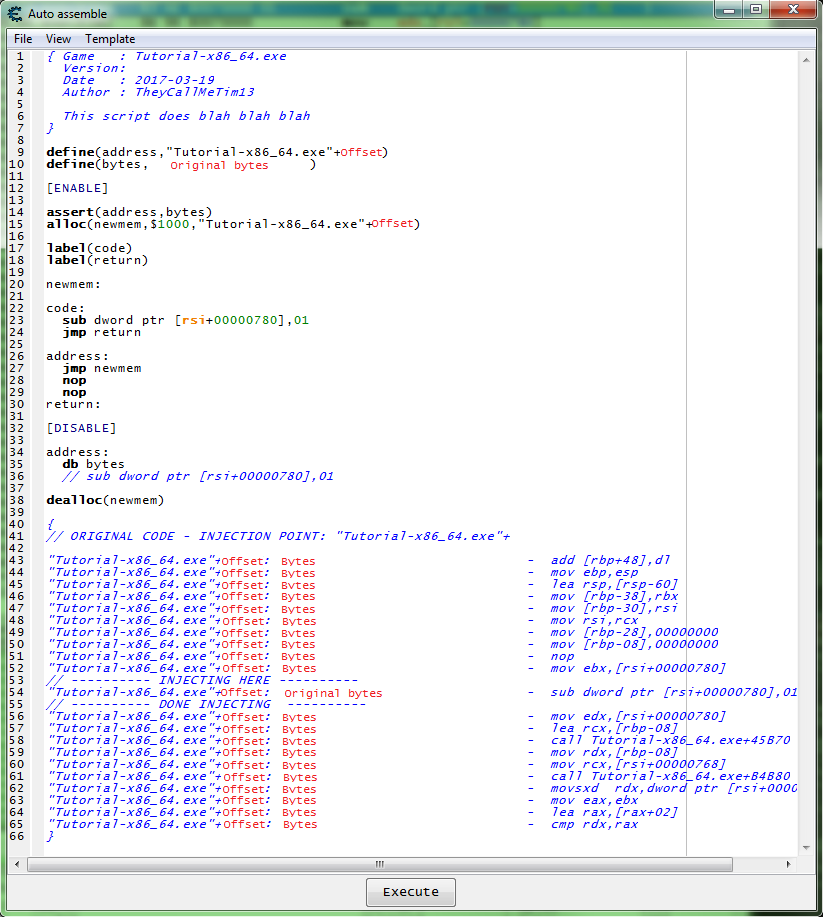
With the instruction selected press Crtl+A, to open an auto assembler form.
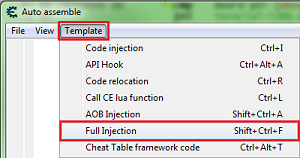
In the auto assembler form menu select template then select full injection.
This will generate some script to start you out.
Now we need to add some code that will increase the value by 2, then remove the original code that decreases the value.
For increasing the value we can use INC or ADD.
So let's try some thing like this.
... newmem: add dword ptr [rsi+780],2 code: //sub dword ptr [rsi+00000780],01 jmp return address: jmp newmem nop nop return: ...
Now add the script to the cheat table.
- If you are unsure how to do that look here: How to add script to table
Then enable the script and click the hit me button.
This should enable the next button, so click the next button to go to the next step.
Step 8
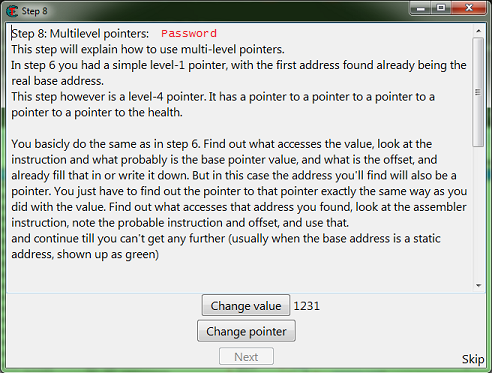
When you start step 8 you should see the form looking like this.
So here we will follow the same steps as step 6, except we'll see what accesses the base address we find, and we'll keep repeating this until a static base is found.
So here is my first debugger output.
10002D8D1 - B9 A00F0000 - mov ecx,00000FA0
10002D8D6 - E8 3522FEFF - call Tutorial-x86_64.exe+XXXXXX
10002D8DB - 89 46 18  - mov [rsi+18],eax  <<<<<<
10002D8DE - 89 C2  - mov edx,eax
10002D8E0 - 48 8D 4D F8  - lea rcx,[rbp-08]

RAX=00000000000007F7
RBX=000000000125CD60
RCX=0000000000000FA0
RDX=00000000828087F3
RSI=0000000001287960  <<<<<<
RDI=0000000100258308
RSP=000000000102F070
RBP=000000000102F0B0
RIP=000000010002D8DE
R8=0000000100161BA0
R9=00000000008E06A0
R10=0000000000000002
R11=0000000000000206
R12=00000000012607C0
R13=0000000100161BA0
R14=0000000100258300
R15=0000000100257A18
I did find a static base on the first scan of the base address but I remember this being a false base. So here what we want is a base address in the form of 'process.exe+offset', you can try one of the others that look like 'module.dll+offset' but I want to say that here they will prove to be false pointers. And yes most newer games will have many false values and pointers.
And the debugger output from the address holding: 0000000001287960
10002D88B - E8 90961200 - call Tutorial-x86_64.exe+XXXXXX
10002D890 - E9 65000000 - jmp Tutorial-x86_64.exe+XXXXXX
10002D895 - 48 83 3E 00 - cmp qword ptr [rsi],00  <<<<<<
10002D899 - 74 5F - je Tutorial-x86_64.exe+XXXXXX
10002D89B - 48 8B 36  - mov rsi,[rsi]

RAX=0000000000013117
RBX=000000000125CD60
RCX=000000000125CD60
RDX=0000000000003CE3
RSI=0000000002D6D540  <<<<<<
RDI=0000000100258308
RSP=000000000102F070
RBP=000000000102F0B0
RIP=000000010002D899
R8=0000000100161BA0
R9=00000000008E06A0
R10=0000000000000002
R11=0000000000000206
R12=00000000012607C0
R13=0000000100161BA0
R14=0000000100258300
R15=0000000100257A18
And the debugger output from the address holding: 0000000002D6D540
10002D845 - E8 D6961200 - call Tutorial-x86_64.exe+XXXXXX
10002D84A - E9 AB000000 - jmp Tutorial-x86_64.exe+XXXXXX
10002D84F - 48 83 7E 18 00 - cmp qword ptr [rsi+18],00  <<<<<<
10002D854 - 0F84 A0000000 - je Tutorial-x86_64.exe+XXXXXX
10002D85A - 48 8B 76 18  - mov rsi,[rsi+18]

RAX=00000000000166D2
RBX=000000000125CD60
RCX=000000000125CD60
RDX=000000000000302E
RSI=0000000002D6CE40  <<<<<<
RDI=0000000100258308
RSP=000000000102F070
RBP=000000000102F0B0
RIP=000000010002D854
R8=0000000100161BA0
R9=00000000008E06A0
R10=0000000000000002
R11=0000000000000206
R12=00000000012607C0
R13=0000000100161BA0
R14=0000000100258300
R15=0000000100257A18
And the debugger output from the address holding: 0000000002D6CE40
10002D800 - E8 1B971200 - call Tutorial-x86_64.exe+XXXXXX
10002D805 - E9 F0000000 - jmp Tutorial-x86_64.exe+XXXXXX
10002D80A - 48 83 7E 10 00 - cmp qword ptr [rsi+10],00  <<<<<<
10002D80F - 0F84 E5000000 - je Tutorial-x86_64.exe+XXXXXX
10002D815 - 48 8B 76 10  - mov rsi,[rsi+10]

RAX=000000000000B567
RBX=000000000125CD60
RCX=000000000125CD60
RDX=00000000000050A1
RSI=000000000123F1C0  <<<<<<
RDI=0000000100258308
RSP=000000000102F070
RBP=000000000102F0B0
RIP=000000010002D80F
R8=0000000100161BA0
R9=00000000008E06A0
R10=0000000000000002
R11=0000000000000206
R12=00000000012607C0
R13=0000000100161BA0
R14=0000000100258300
R15=0000000100257A18
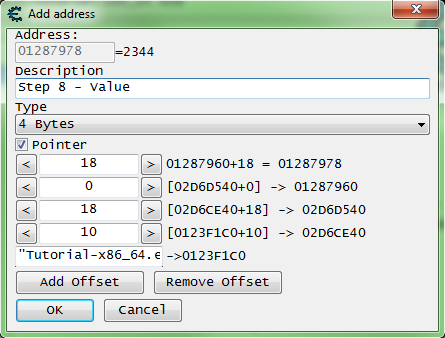
Now we scan for that base '000000000123F1C0' and you should find a static address, but in real games you would keep going until a static base is found.
With that static address as the base my pointer will look like this.
[[[["Tutorial-x86_64.exe"+XXXXXX]+10]+18]+0]+18
After you have found the pointer, freeze it at 5000, then click the change pointer button. If you found the right base the next button should become enabled after about 2 seconds. So click the next button to go to the next step.
Step 9
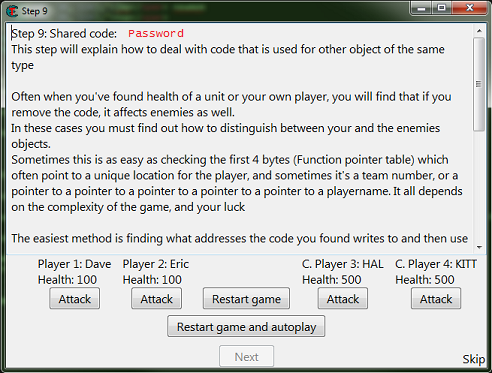
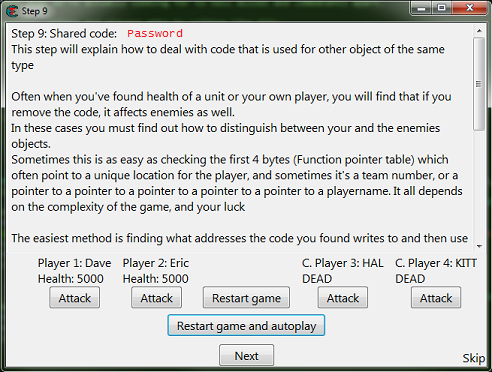
When you start step 9 you should see the form looking like this.
So here like the help text says there is far more then one solution.
First we need to find one of the addresses and add it to the table.
If you are having trouble finding an address, remember to try different value types, and don't forget to start new scans.
Then like in step 7 we want to see what accesses the address, to find the function that writes to the actor's health.
Go ahead and save the password if you want to try different ways, this is the last step in the tutorial.
So here it's good to understand what we're actually looking for to tell allies and combatants apart.
When the game or engine is written, actors and players mite be written like this.
//// Actor, base for all actors class Actor(object){ string Name = 'Actor'; Coord Coords = new Coord(0, 0, 0); float Health = 100.0; ... } //// Player class Player(Actor){ //// Player inherits form Actor string Name = 'Player'; int Team = 1; ... }
The team it self could be a structure, say if it's declared as an object class like the 'Coords' variable, which we would want to look for a pointer to the actor's team structure.
So one way we could do this is to find the team id or team structure in the player structure.
Find the team id in the player structure
After you have found the function that decreases health.
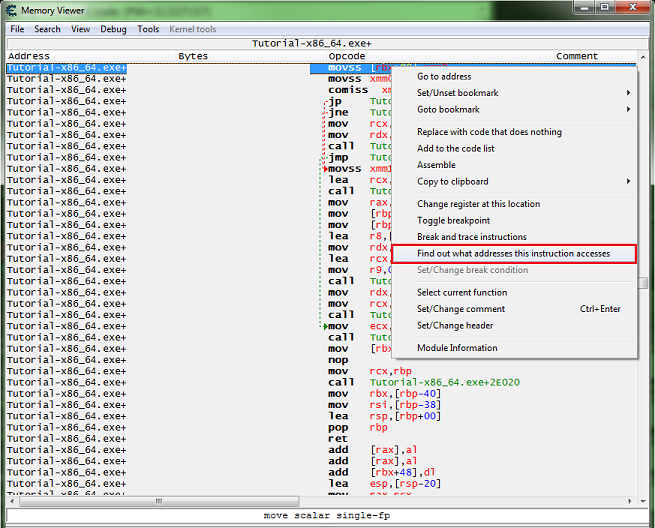
Right click the instruction in the disassembler view form, and select find out what addresses this instruction accesses.
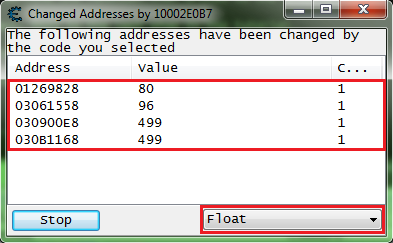
Then click the attack button for all 4 values.
You should have all 4 addresses in the debugger list.
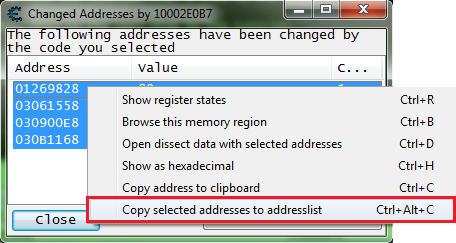
So go ahead and add them to the address list.
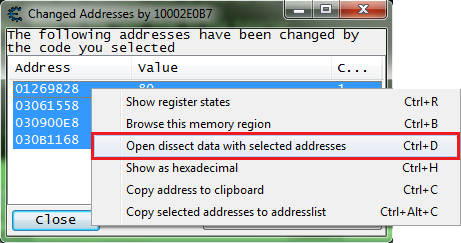
Then let's open the dissect data structure form.
You'll get some pop ups, after going thought them you should see a form like this. Note that I had to expand the width of the form to be able to move the columns.
Now on mine offset 0x10 was guessed as a pointer which is 8 bytes wide in a 64 bit process. I saw that the pointers at 0x10 had values that really didn't look like pointers.
So I had to switch it to 4 byte, and add a new element set it's offset to 0x14 with 4 byte value type. This is often the way it works.
So here we can see that the team variable is at offset 0x10 of the structure.
Now we need to add some injection code to a script, then add some code that checks the team variable of the structure, to determine which actors are allies and which are combatants.
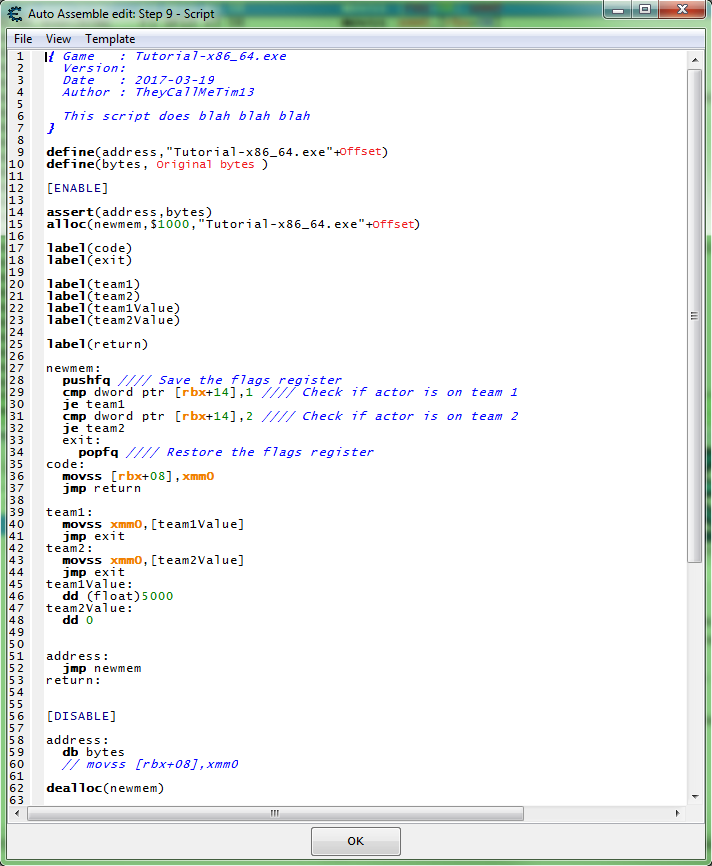
So we want some this like this.
So with this script enabled,
when the game writes to an actors health here is what will happen after the jump to the hook code:
- Save (PUSH) the RFLAGS register, not completely needed but still a good habit when comparing.
- Check if actor is on team 1.
- If actor is on team 1, then we set the new value to 5000 in a floating point format.
- Check if actor is on team 2.
- If actor is on team 2, then we set the new value to 0 in hex format. (float 0 == int 0 == hex 0)
- Restore (POP) the RFLAGS register, this is completely needed if the register was PUSHed.
With this script enabled, click the restart game and autoplay button, then you should see the form change and look like this.
So click the next button to complete the tutorial.
Then you should see a form telling you that you have completed the tutorial.
Find a difference in the registers
After you have found the function that decreases health.
Right click the instruction in the disassembler view form, and select find out what addresses this instruction accesses.
Then click the attack button for all 4 values.
You should have all 4 addresses in the debugger list.
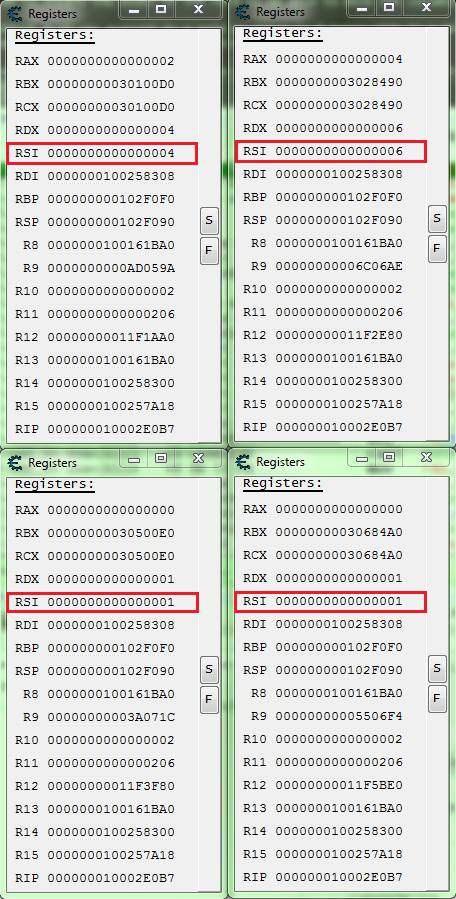
Now let's look at the registers to see if we can find a difference in the allies and combatants.
Select each address individually and press Ctrl+R.
Arrange the forms to make it easier to compare.
So here we can see that RSI is 1 for the combatants.
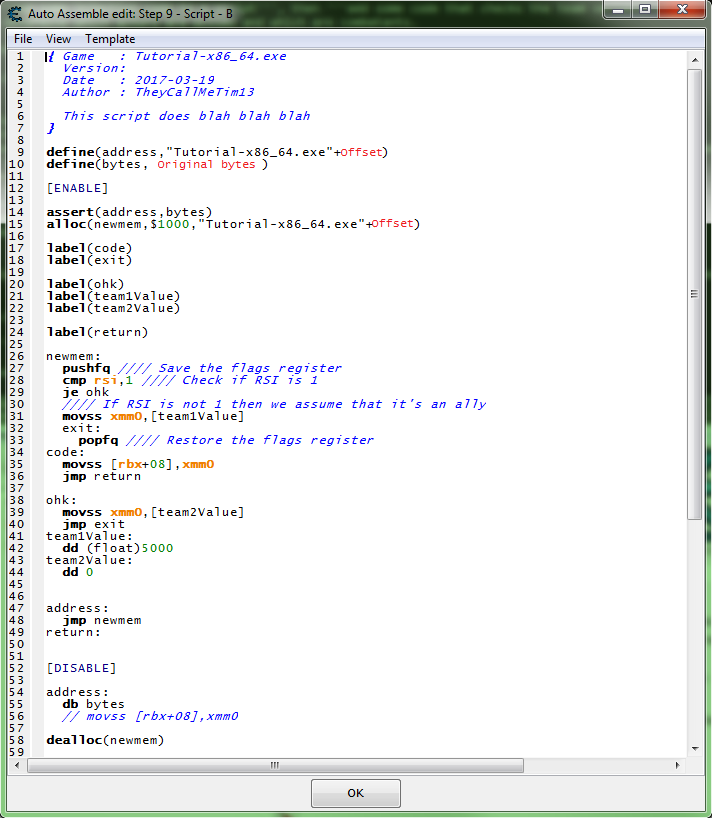
So a script like this should work.
So with this script enabled,
when the game writes to an actors health here is what will happen after the jump to the hook code:
- Save (PUSH) the RFLAGS register, not completely needed but still a good habit when comparing.
- Check if RSI register is 1.
- If RSI register is 1, then we set the new value to 0 in hex format. (float 0 == int 0 == hex 0)
- If RSI register is not 1, then we assume the actor is an ally so we set the new value to 5000 in a floating point format.
- Restore (POP) the RFLAGS register, this is completely needed if the register was PUSHed.
With this script enabled, click the restart game and autoplay button, then you should see the form change and look like this.
So click the next button to complete the tutorial.
Then you should see a form telling you that you have completed the tutorial.

