Difference between revisions of "Tutorial:LuaFormListView"
(Created page with '<!-- Tutorial:LuaFormListView --> Category:Tutorial Category:Lua {{DISPLAYTITLE:Tutorial - Using a ListView}} This will be concentrating on the '''ListView''' control, c…') |
m |
||
| Line 12: | Line 12: | ||
area on the form to set its extends. | area on the form to set its extends. | ||
| − | [[File:TutorialListViewAdd.png]] | + | [[File:TutorialListViewAdd.png||Add ListView|border]] |
| + | |||
| + | In the properties change the '''ViewStyle''' to '''vsReport''', this gives us | ||
| + | a normal view with rows and columns. Also change '''ReadOnly''' to true | ||
| + | because we won't allow editing, and '''RowSelect''' to true so clicking | ||
| + | will select an entire row instead of just one column value: | ||
| + | |||
| + | [[File:TutorialListViewProps.png||ListView ReadOnly, RowSelect, and ViewStyle|border]] | ||
| + | |||
| + | Now let's add a column. Click on the '''Columns''' property and the '...' to the | ||
| + | right to open the column editor and click 'Add' to add a new column. Here I set | ||
| + | the '''Caption''' of the column to 'Message' and changed the '''Width''' from | ||
| + | 50 to 200. You can also change the width by dragging the column separator | ||
| + | on the design form. | ||
| + | |||
| + | Now close design mode by clicking the '''X''' on the top right of the toolbar window | ||
| + | and the form will display in normal mode. Execute this code: | ||
| + | |||
| + | <pre>local items = UDF1.CEListView1.Items | ||
| + | items.Clear() | ||
| + | local item = items.Add() | ||
| + | item.Caption = "First item" | ||
| + | item = items.Add() | ||
| + | item.Caption = "Second item"</pre> | ||
| + | |||
| + | That will clear the list and add a couple of items that you can see: | ||
| + | |||
| + | [[File:TutorialListViewOneCol.png||ListView Sample One Column Values|border]] | ||
Revision as of 02:33, 23 July 2018
This will be concentrating on the ListView control, check out this tutorial to learn more about working with forms in general.
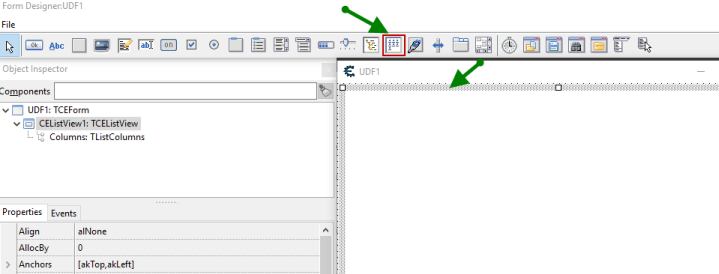
To get started create a form with Table->Create form, this generated a UDF1 form for me. Now click the ListView button and drag an area on the form to set its extends.
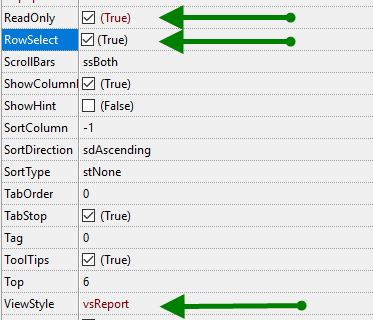
In the properties change the ViewStyle to vsReport, this gives us a normal view with rows and columns. Also change ReadOnly to true because we won't allow editing, and RowSelect to true so clicking will select an entire row instead of just one column value:
Now let's add a column. Click on the Columns property and the '...' to the right to open the column editor and click 'Add' to add a new column. Here I set the Caption of the column to 'Message' and changed the Width from 50 to 200. You can also change the width by dragging the column separator on the design form.
Now close design mode by clicking the X on the top right of the toolbar window and the form will display in normal mode. Execute this code:
local items = UDF1.CEListView1.Items
items.Clear()
local item = items.Add()
item.Caption = "First item"
item = items.Add()
item.Caption = "Second item"
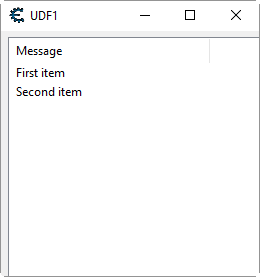
That will clear the list and add a couple of items that you can see:


