Difference between revisions of "Tutorials:Auto Assembler:Injection basic"
| (8 intermediate revisions by the same user not shown) | |||
| Line 1: | Line 1: | ||
| + | [[Category:Tutorial]] | ||
| + | [[Category:Auto Assembler]] | ||
| + | [[Category:Code Injection]] | ||
| + | {{DISPLAYTITLE:Code Injection - Basic}} | ||
So in most games to really do any thing cool, you will want or need to use code injection. | So in most games to really do any thing cool, you will want or need to use code injection. | ||
| Line 19: | Line 23: | ||
=== Step 1 === | === Step 1 === | ||
| − | First we need to find the code we want so '''select the address of the score in the address list''', | + | First we need to find the code we want, so '''select the address of the score in the address list''', |
'''right-click and select ''find out what writes to this address'''''. | '''right-click and select ''find out what writes to this address'''''. | ||
| − | [[File:CEForm.AutoAssembler.CodeInjection.01.png]] | + | [[File:CEForm.AutoAssembler.CodeInjection.01.png|border]] |
A message window will tell you ''this will attach the debugger of Cheat Engine to the current process. Continue?''. | A message window will tell you ''this will attach the debugger of Cheat Engine to the current process. Continue?''. | ||
| Line 31: | Line 35: | ||
=== Step 2 === | === Step 2 === | ||
| − | Then '''you should see some code come up in the debugger window''', with the number of times it | + | Then '''you should see some code come up in the debugger window''', with the number of times it has written to the address: |
FF8396CC - 41 83 43 14 FE - add dword ptr [r11+14],-02 | FF8396CC - 41 83 43 14 FE - add dword ptr [r11+14],-02 | ||
| − | [[File:CEForm.AutoAssembler.CodeInjection.02.png]] | + | [[File:CEForm.AutoAssembler.CodeInjection.02.png|border]] |
Once some code comes up you can '''click the ''stop'' button'''. | Once some code comes up you can '''click the ''stop'' button'''. | ||
| − | [[File:CEForm.AutoAssembler.CodeInjection.03.png]] | + | [[File:CEForm.AutoAssembler.CodeInjection.03.png|border]] |
Then '''click on the line of code''', this should enable the buttons, | Then '''click on the line of code''', this should enable the buttons, | ||
now '''click the ''show disassembler'' button'''. | now '''click the ''show disassembler'' button'''. | ||
| − | [[File:CEForm.AutoAssembler.CodeInjection.04.png]] | + | [[File:CEForm.AutoAssembler.CodeInjection.04.png|border]] |
This will bring up the disassembler / memory view form. | This will bring up the disassembler / memory view form. | ||
| − | [[File:CEForm.AutoAssembler.CodeInjection.disassembler.01.png]] | + | [[File:CEForm.AutoAssembler.CodeInjection.disassembler.01.png|border]] |
=== Step 3 === | === Step 3 === | ||
| Line 53: | Line 57: | ||
'''right-click and select ''find out what addresses this instruction accesses'''''. | '''right-click and select ''find out what addresses this instruction accesses'''''. | ||
| − | [[File:CEForm.AutoAssembler.CodeInjection.disassembler.02.png]] | + | [[File:CEForm.AutoAssembler.CodeInjection.disassembler.02.png|border]] |
=== Step 4 === | === Step 4 === | ||
| Line 61: | Line 65: | ||
So we are '''looking to see that this only accesses the score address'''. | So we are '''looking to see that this only accesses the score address'''. | ||
| − | [[File:CEForm.AutoAssembler.CodeInjection.disassembler.03.png]] | + | [[File:CEForm.AutoAssembler.CodeInjection.disassembler.03.png|border]] |
So if only the address we want (the score) comes up then we can '''close the window''', | So if only the address we want (the score) comes up then we can '''close the window''', | ||
| Line 70: | Line 74: | ||
or just press ''Ctrl+A''. | or just press ''Ctrl+A''. | ||
| − | [[File:CEForm.AutoAssembler.CodeInjection.disassembler.04.png]] | + | [[File:CEForm.AutoAssembler.CodeInjection.disassembler.04.png|border]] |
| Line 80: | Line 84: | ||
so on the form's menu '''click ''template'' then click ''cheat table framework code'''''. | so on the form's menu '''click ''template'' then click ''cheat table framework code'''''. | ||
| − | [[File: | + | [[File:Tutorials.AddScriptToTable.AssignToTable.Template-CTFramework.01.png|border]] |
This will give you the base code needed to add a script to the table. | This will give you the base code needed to add a script to the table. | ||
| − | [[File:CEForm.AutoAssembler.CodeInjection.autoAssembler.02.png]] | + | [[File:CEForm.AutoAssembler.CodeInjection.autoAssembler.02.png|border]] |
=== Step 2 === | === Step 2 === | ||
So now on the form's menu '''click ''template'' then click ''full injection'''''. | So now on the form's menu '''click ''template'' then click ''full injection'''''. | ||
| − | [[File:CEForm.AutoAssembler.CodeInjection.autoAssembler.03.png]] | + | [[File:CEForm.AutoAssembler.CodeInjection.autoAssembler.03.png|border]] |
You will be prompted for the address if you haven't changed the selected code in the memory view form, | You will be prompted for the address if you haven't changed the selected code in the memory view form, | ||
then '''click the ''ok'' button'''. | then '''click the ''ok'' button'''. | ||
| − | [[File:CEForm.AutoAssembler.CodeInjection.autoAssembler.04.png]] | + | [[File:CEForm.AutoAssembler.CodeInjection.autoAssembler.04.png|border]] |
This will give you the base code needed for a full injection. | This will give you the base code needed for a full injection. | ||
| − | [[File:CEForm.AutoAssembler.CodeInjection.autoAssembler.05.png]] | + | [[File:CEForm.AutoAssembler.CodeInjection.autoAssembler.05.png|border]] |
=== Step 3 === | === Step 3 === | ||
| Line 106: | Line 110: | ||
::so here lines 13, 14, 16, 17, 18, and 24 are showing that they have changed. | ::so here lines 13, 14, 16, 17, 18, and 24 are showing that they have changed. | ||
| − | [[File:CEForm.AutoAssembler.CodeInjection.autoAssembler.06.png]] | + | [[File:CEForm.AutoAssembler.CodeInjection.autoAssembler.06.png|border]] |
=== Step 3 === | === Step 3 === | ||
| Line 115: | Line 119: | ||
So we need some thing like this: | So we need some thing like this: | ||
| − | [[File:CEForm.AutoAssembler.CodeInjection.autoAssembler.07.png]] | + | [[File:CEForm.AutoAssembler.CodeInjection.autoAssembler.07.png|border]] |
=== Step 4 === | === Step 4 === | ||
Now we can add this to the table, so on the form's menu '''click ''file'' then click ''assign to current cheat table'''''. | Now we can add this to the table, so on the form's menu '''click ''file'' then click ''assign to current cheat table'''''. | ||
| − | [[File: | + | [[File:Tutorials.AddScriptToTable.AssignToTable.01.png|border]] |
This should create a memory record in the tables address list. | This should create a memory record in the tables address list. | ||
| − | [[File: | + | [[File:Tutorials.AddScriptToTable.AssignToTable.CTScript.01.png|border]] |
| Line 134: | Line 138: | ||
'''enable the script''' (click the box or with it selected press the space bar). | '''enable the script''' (click the box or with it selected press the space bar). | ||
| − | [[File:CEForm.AutoAssembler.CodeInjection.addrLst.script.02.png]] | + | [[File:CEForm.AutoAssembler.CodeInjection.addrLst.script.02.png|border]] |
You should see a red X in the enabler box, 5 Nops, and the same code as before the injection on the next line, | You should see a red X in the enabler box, 5 Nops, and the same code as before the injection on the next line, | ||
if all went as planed. | if all went as planed. | ||
| − | [[File:CEForm.AutoAssembler.CodeInjection.addrLst.script.03.png]] | + | [[File:CEForm.AutoAssembler.CodeInjection.addrLst.script.03.png|border]] |
Now '''check that the score doesn't get decreased'''. | Now '''check that the score doesn't get decreased'''. | ||
| Line 147: | Line 151: | ||
and the red X should be gone and the original code should be injected back. | and the red X should be gone and the original code should be injected back. | ||
| − | [[File:CEForm.AutoAssembler.CodeInjection.addrLst.script.04.png]] | + | [[File:CEForm.AutoAssembler.CodeInjection.addrLst.script.04.png|border]] |
Now '''check that the score gets decreased'''. | Now '''check that the score gets decreased'''. | ||
| Line 155: | Line 159: | ||
| − | + | {{Template:CodeInjectionSeeAlso}} | |
| − | |||
| − | |||
| − | |||
| − | |||
| − | |||
| − | |||
| − | |||
| − | |||
== External links == | == External links == | ||
Latest revision as of 20:26, 22 April 2018
So in most games to really do any thing cool, you will want or need to use code injection.
Now there are different types of injection, the most common methods are DLL injection and assembly injection. We will be going over assembly injection.
Specifically what's called a basic assembly injection.
Any game will work but I will be using Windows Solitaire.
First you will need to find the score.
If unsure how to find values see: Finding values - Integers
Contents
Finding the injection point[edit]
After you have found the address of the score then we can find the injection point. Where this is depends on what we want to do so in Windows Solitaire the score decreases over timer, lets stop that.
Step 1[edit]
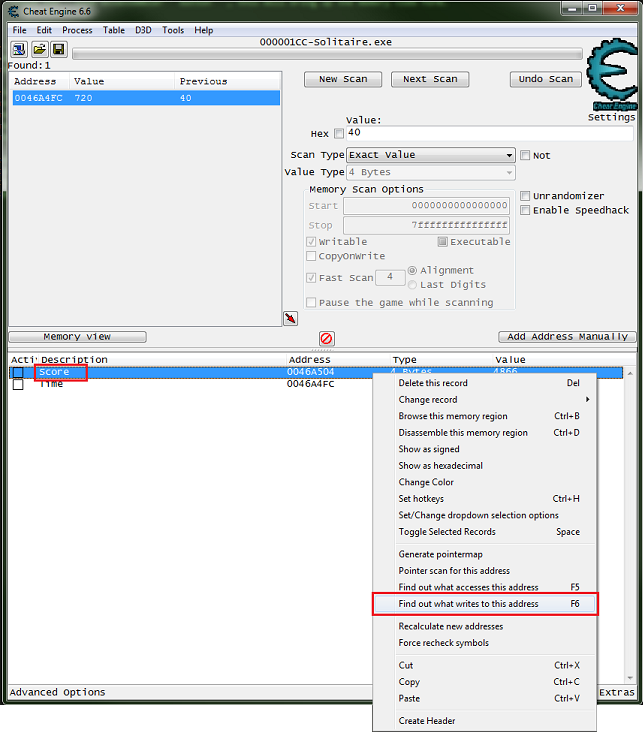
First we need to find the code we want, so select the address of the score in the address list, right-click and select find out what writes to this address.
A message window will tell you this will attach the debugger of Cheat Engine to the current process. Continue?. click the yes button.
- If you are having trouble try changing the debugger settings.
Now we wait for the score to decrease.
Step 2[edit]
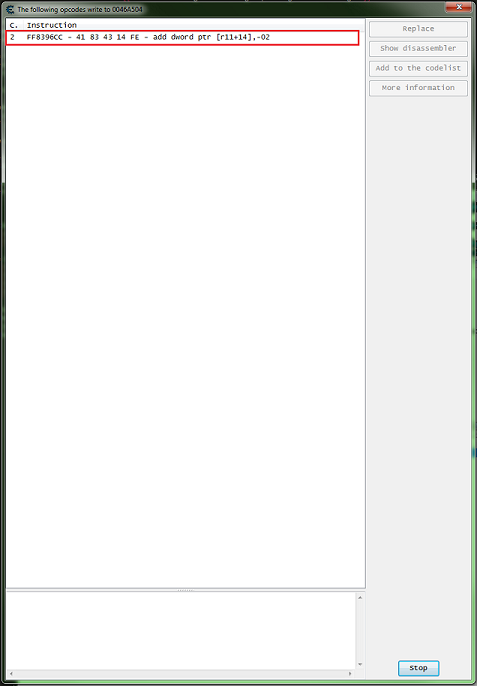
Then you should see some code come up in the debugger window, with the number of times it has written to the address:
FF8396CC - 41 83 43 14 FE - add dword ptr [r11+14],-02
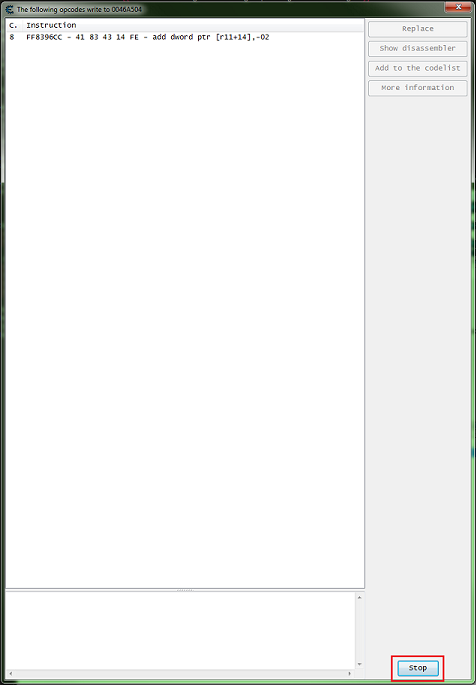
Once some code comes up you can click the stop button.
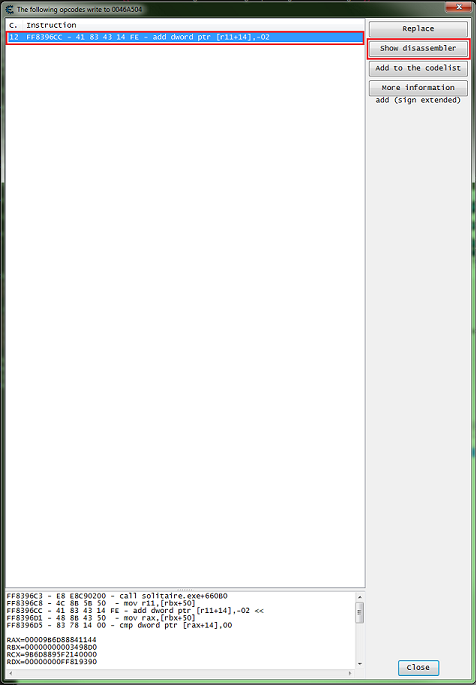
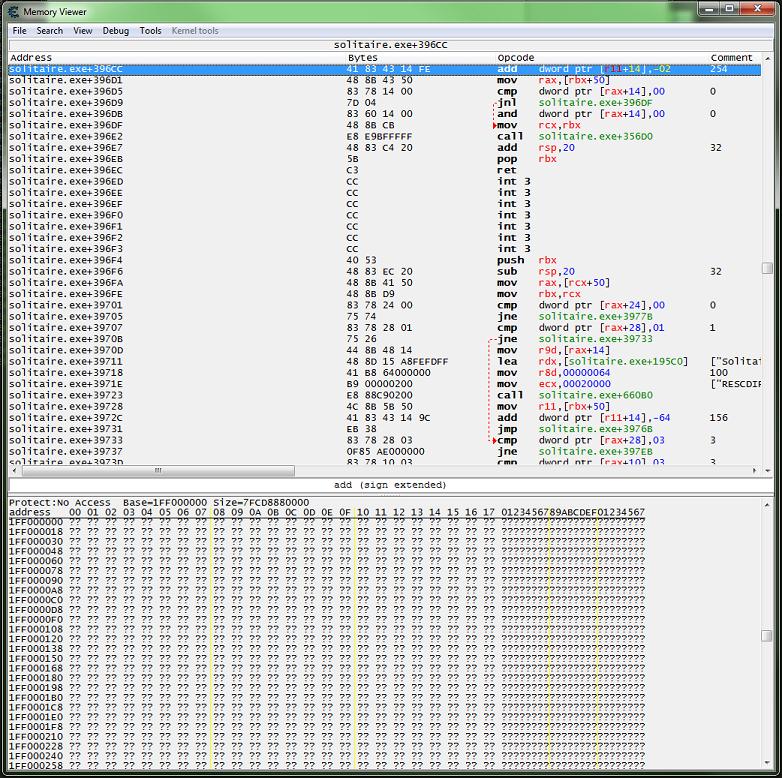
Then click on the line of code, this should enable the buttons, now click the show disassembler button.
This will bring up the disassembler / memory view form.
Step 3[edit]
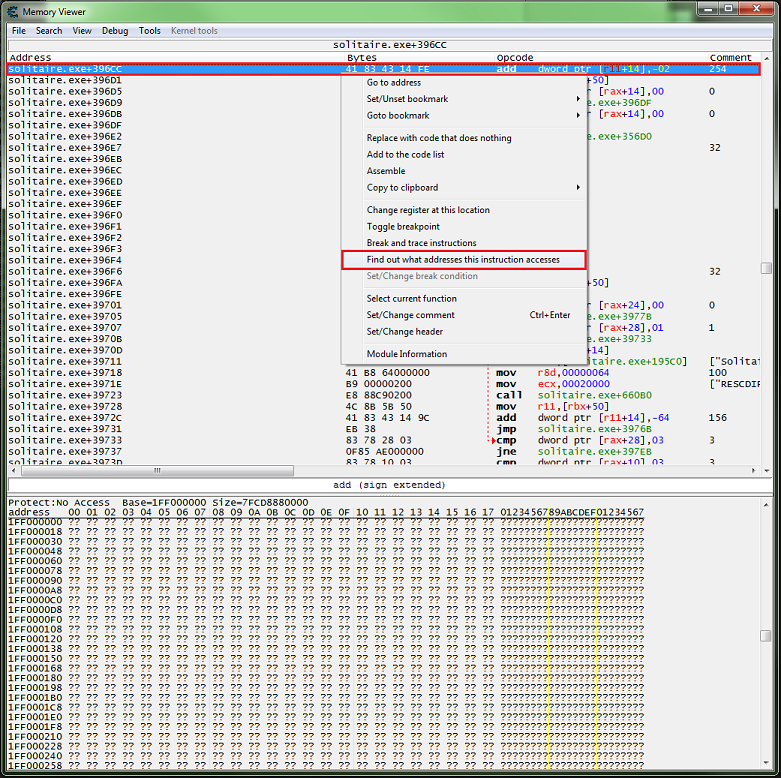
With the disassembler / memory view form open, on the highlighted line of code right-click and select find out what addresses this instruction accesses.
Step 4[edit]
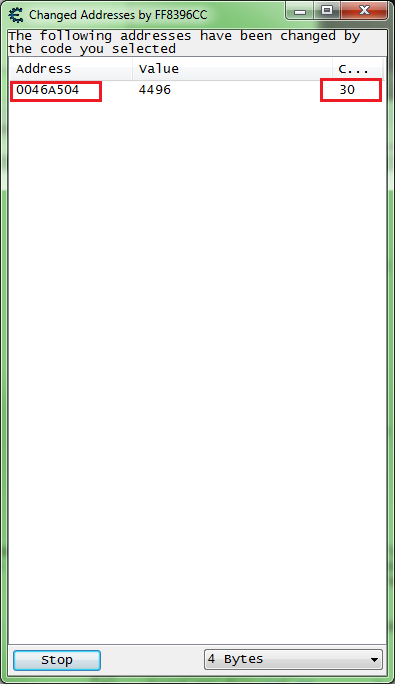
Now let it run for a while, make some moves, and see what comes up. In most games this is a good thing to do because many functions deal with multiple addresses.
So we are looking to see that this only accesses the score address.
So if only the address we want (the score) comes up then we can close the window, click the form close button or click the stop button then it becomes a close button and just click it again.
Step 5[edit]
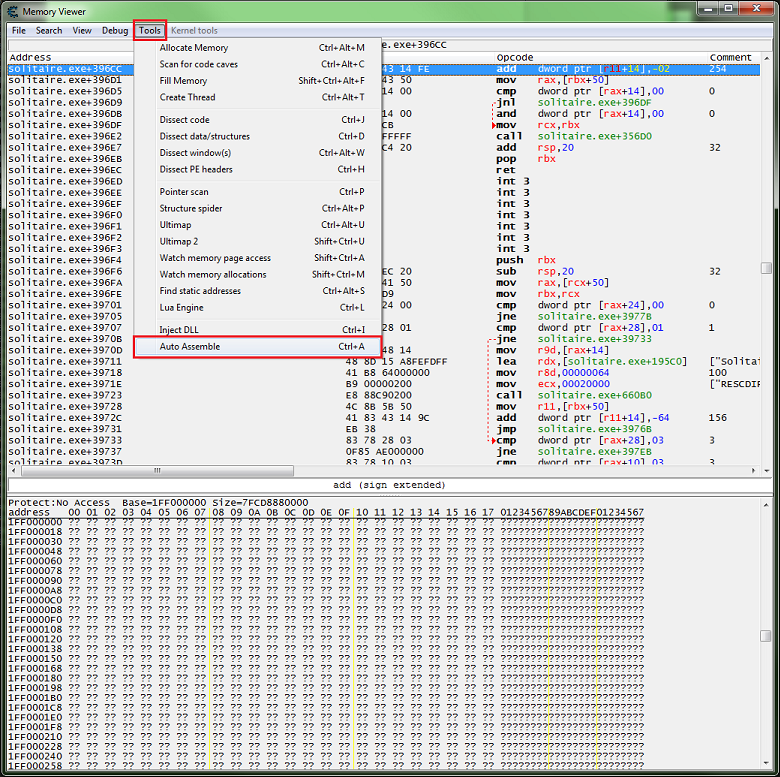
Now on the memory view form menu select tools then select auto assemble, or just press Ctrl+A.
Writing the injection code[edit]
Now here is where you could just NOP the line of code, but we will setup a script to enable and disable the injection.
Step 1[edit]
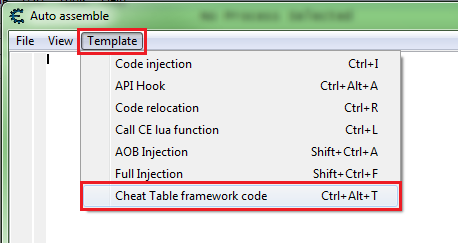
The easiest way to do this is with templates, so on the form's menu click template then click cheat table framework code.
This will give you the base code needed to add a script to the table.
Step 2[edit]
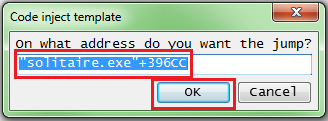
So now on the form's menu click template then click full injection.
You will be prompted for the address if you haven't changed the selected code in the memory view form, then click the ok button.
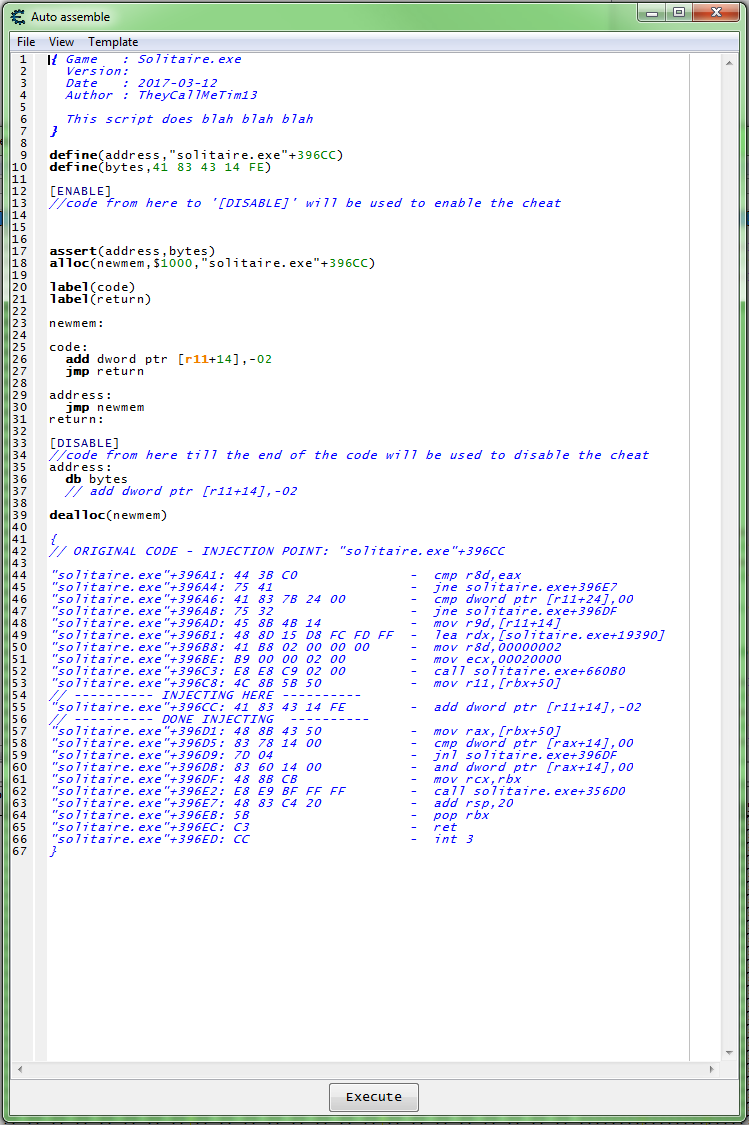
This will give you the base code needed for a full injection.
Step 3[edit]
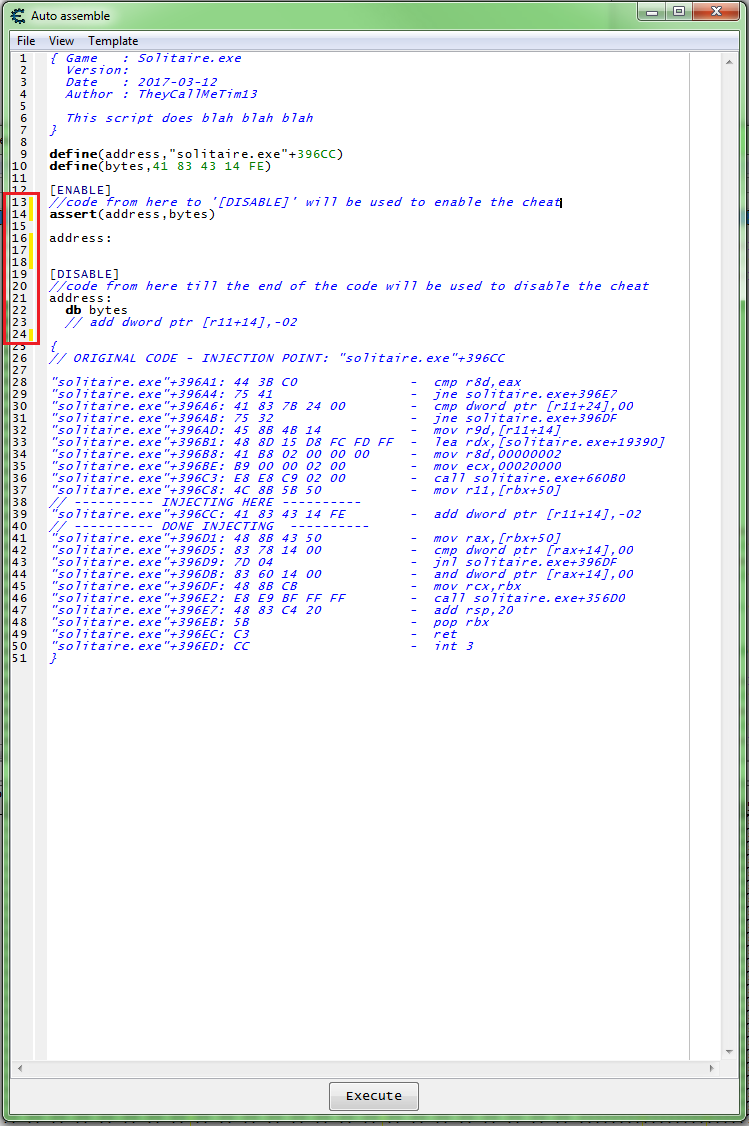
But we don't need a full injection for this so we can remove some code.
- Note the yellow lines, these mark code changes on that line.
- so here lines 13, 14, 16, 17, 18, and 24 are showing that they have changed.
Step 3[edit]
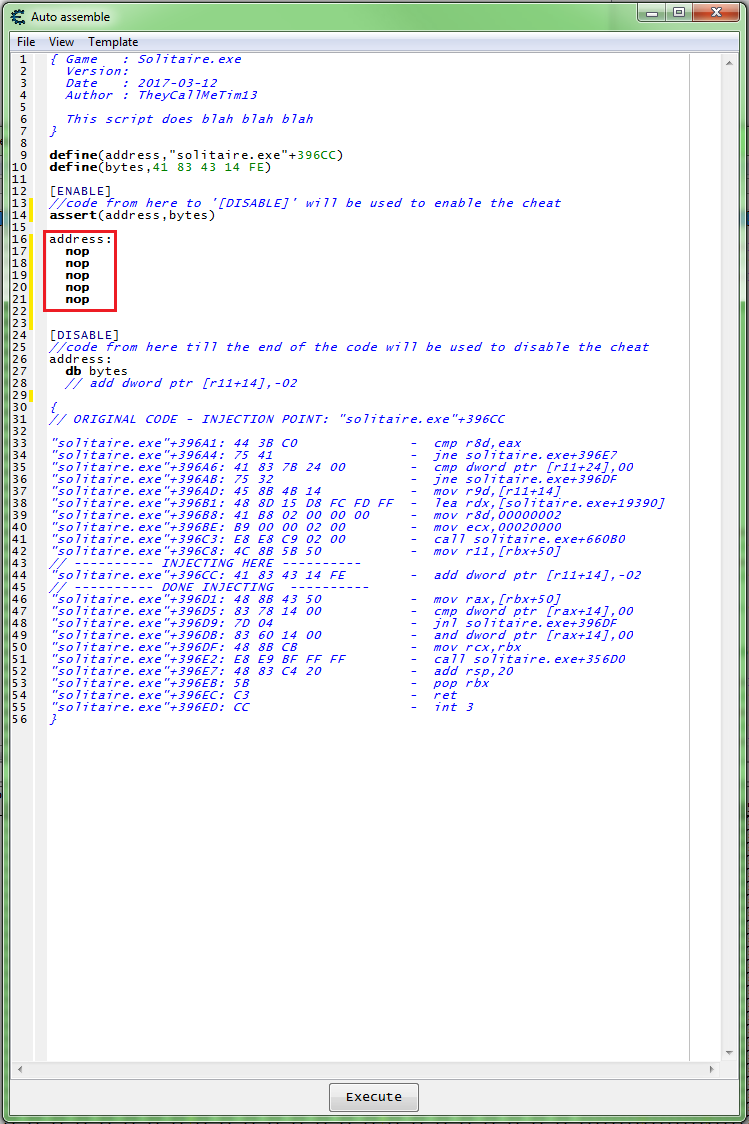
So now we need to add the injection code, we'll just NOP the instruction out. If we look at the injection information (the commented out code at the bottom). We can see that the instruction is 5 bytes long, so we need 5 NOPs to disable the score decrease function.
So we need some thing like this:
Step 4[edit]
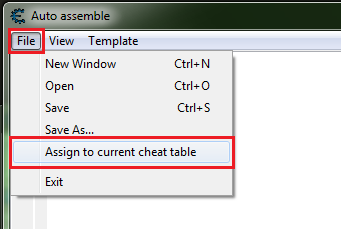
Now we can add this to the table, so on the form's menu click file then click assign to current cheat table.
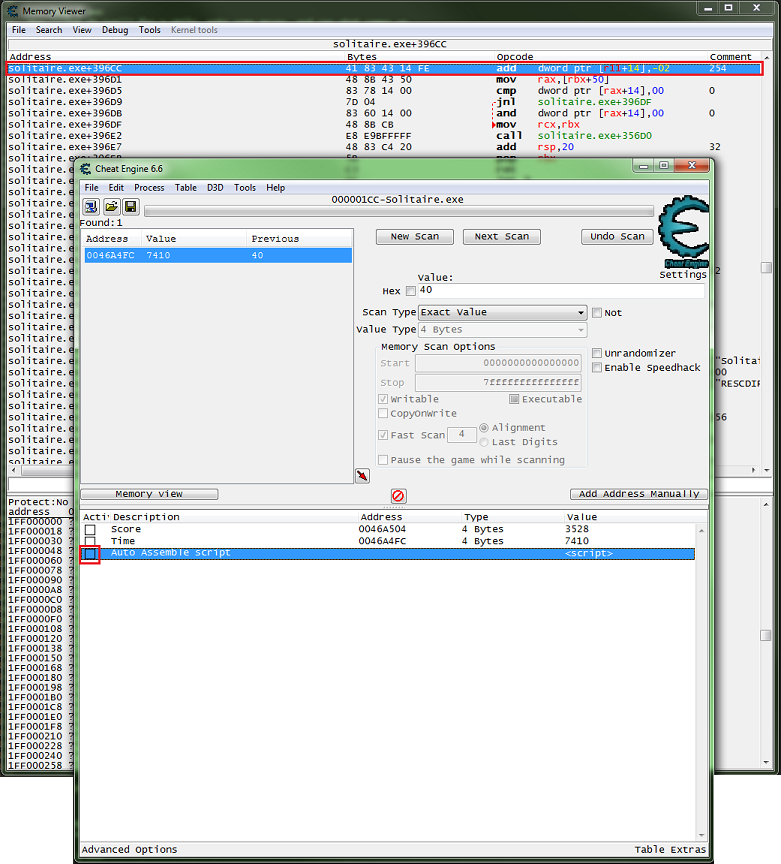
This should create a memory record in the tables address list.
Testing the injection code[edit]
Now we are ready to test the code.
Enable[edit]
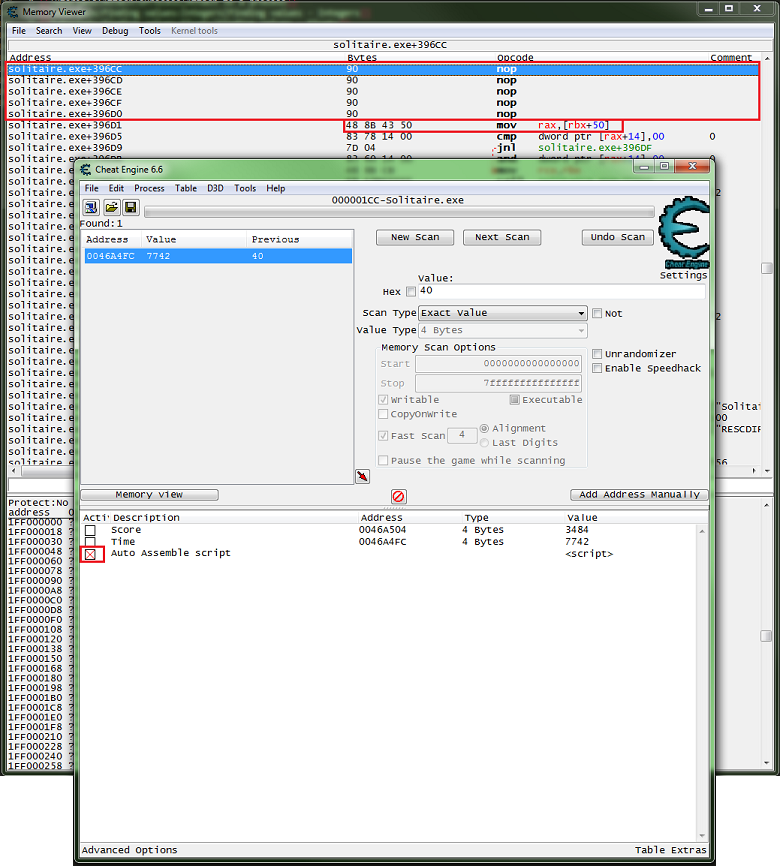
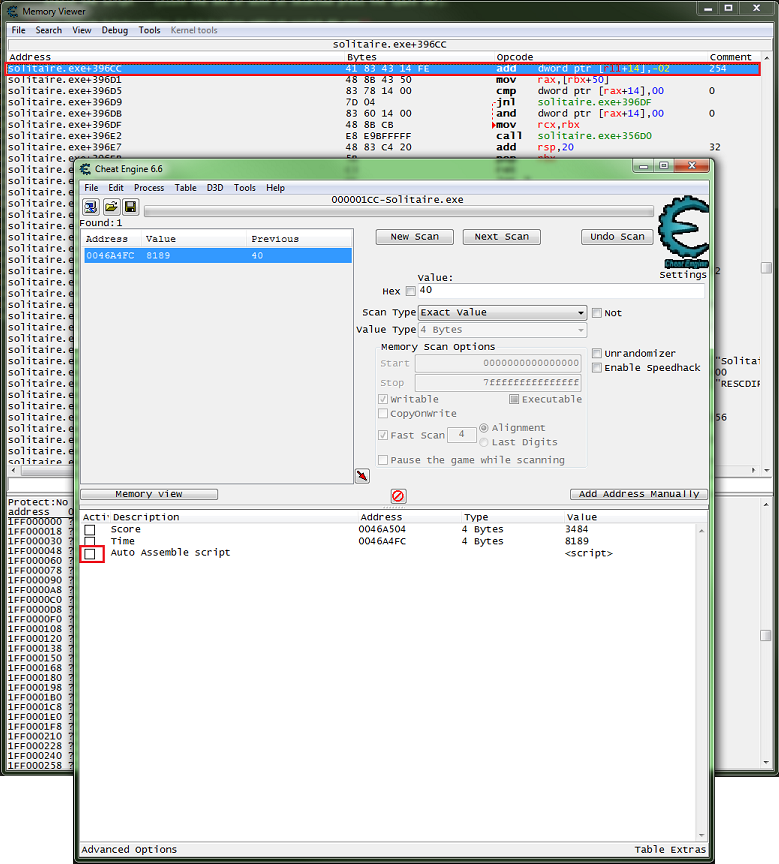
With the memory view form visible, looking at the injection line, enable the script (click the box or with it selected press the space bar).
You should see a red X in the enabler box, 5 Nops, and the same code as before the injection on the next line, if all went as planed.
Now check that the score doesn't get decreased.
Disable[edit]
Now disable the script, same steps as enabling, and the red X should be gone and the original code should be injected back.
Now check that the score gets decreased.
And that's that basics of assembly injection with Cheat Engine.
See also[edit]
- Code Injection - basic
- Code Injection - full
- Code Injection - editable values
- Code injection
- Tutorials
